Follow me as I attempt to teach myself to make gorgeous cakes.

I have almost NO experience in making professional looking cakes. None. I'm pretty good at making dinners and lunches and even breakfasts but desserts...desserts are a different story. I'm.. okay, but I'm not great. While keeping this blog, I hope to get better each and every day, or as often as I can afford ingredients. I'm going to teach myself to make professional looking desserts, one day at a time. <3


Thursday, June 30, 2011

Day 6: Earthquake Cake.

Yum yum yum.

Fresh from the oven, smelling delightful.

Cooled to room temperature.

My fail... trying to turn it out onto the cooling rack for aesthetic purposes...

The bottom really didn't wanna come up out of the dish.....

So I had to scrape and try to put it back together... Whoops.

Finished Product.  It was yummy.  Have your milk ready though, it's oober rich.


     The first time I tried this cake, my friend Stephen brought if over because his Mom had made it for him for his birthday, but I was throwing the party.  I tried it, and it was absolutely wonderful, aside from the coconut.  I looked up a million recipes, but none seemed to be the same as that one, so the closest I got was this one.


     Here is the recipe I used.  It's sort of adapted from the one above, but not much. 

  • 1 pkg German Chocolate Cake Mix.
  • 1 cup chopped pecans.
  • 1 cup chopped walnuts.
  • 1 8 oz. pkg cream cheese, softened.
  • 1 16 oz. pkg confectioner's sugar.
  • 1 stick of butter or margarine, softened.
  • 2 tsp. whole milk.

     LIBERALLY grease and flour the bottom and edges of a 9 x 13 x 2 baking dish.  I didn't do this liberally enough apparently because the bottom of my cake wanted to stick when I went to flip it... I had to scrape it off and put it back together like a puzzle... but I digress.  Cover the bottom of the baking dish with the chopped pecans and walnuts.
     Make the German Chocolate Cake Mix according to package instructions.  Pour the batter over the pecans and walnuts.  Next, in a medium mixing bowl, beat the softened butter, softened cream cheese, confectioner's sugar, and milk together until completely incorporated and smooth.  Pour this over the cake mixture.  I poured mine directly down the center and sort of spread it.  I'm not sure if that made a difference but it was just too thick to make a perfect layer over the top.  Bake on the center rack of a preheated 325 degree oven for about an hour or until the middle cracks. (That's why it's called an earthquake cake.) 
     I don't think you HAVE to turn it out onto a cooling rack once it's cooled to room temp, I just thought it would look prettier that way for the blog... obviously that was a mistake.. LOL. 
     You could substitute the walnut for flaked coconut if you want, but I just really detest coconut... it's a texture thing... Anyway, also, the other recipe called for a teaspoon of vanilla extract in the cream cheese mixture, but I didn't have any.  After eating it, and seeing how incredibly rich it was, I don't know if vanilla would be the best idea, but I'm very new to this, so feel free to let me know that I'm wrong.  To me, it tastes EXACTLY like pecan pie, only instead of crust, you have delicious chocolate cake.  I guess that's it.   Happy Baking!!!

Wednesday, June 29, 2011

Day 5: I know it's been a while.

     Hey guys, I know I have just barely started this blog and already I'm slacking, but it's for a legitimate reason.  I'm just flat broke.  I finally got just about all of the baking supplies I need for the next few weeks, however we ran out of butter recently, and I got the wrong kind of food coloring for some things, and just little things like that.  So I haven't been able to bake recently.  I'm definitely going to update tonight if I can get some butter.  Thanks for following, I know I'm sort of boring when I'm not baking, lol.  I love you guys. <3

Monday, June 20, 2011

Day 4: Cinnamon Roll Triangles.

     So, I stumbled upon this recipe via Stumbleupon, LOL.  I'll post the link for the full recipe, and then I'll post the pictures of when I made them tonight.  I totally forgot to take pictures of each step, so I just have 2 of them.  The only thing I did differently was I used store bought Cream Cheese frosting.  I have a tummy ache from eating too many, which just shows how addictive they are.  Thanks, Ms. Blogger!!!


     Cinnamon Toast Rolls.


Sunday, June 19, 2011

Day 3: Chess Squares.

     So, today I made some Chess Squares.   I got this recipe from my Great Aunt and it's always been a hit. She explained them to me as being 'cheesecake brownies'.  I personally find them quite addictive, and I love them the day after for breakfast.  They're pretty packed with sugar and butter, but totally worth it.  As Emeril says, dessert isn't something you have every day. c:

     You will need:

     For Crust:

     * 9 x 13 x 2'' glass baking dish. (greased and floured)
     * 1 pkg. yellow cake mix.  (I used Betty Crocker Golden Vanilla)
     * 1 egg, lightly beaten.
     * 1 stick butter, softened.

     For Filling:

     * 16 oz. confectioner's sugar.
     * 2, 8 oz pkgs. cream cheese, softened.
     * 3 eggs, lightly beaten.


     Preheat the oven to 350 degrees. In a medium mixing bowl, beat cake mix, egg, and butter until combined.  Mixture will be crumbly.  Press into the bottom of the greased and floured baking dish.  In another medium mixing bowl, beat the eggs, and cream cheese until almost completely smooth.  Mixture will look like cottage cheese, (ack).  Add the confectioner's sugar all at once, and stir with a spoon a bit so that when you use the mixer again, the sugar doesn't fly EVERYWHERE.  I learned this the hard way.  Beat until almost completely smooth.  There will be small lumps of sugar, and that's fine.  Pour onto the crust. 

Bake for 35-40 minutes or until the top is lightly browned around the edges a a little bubbly.  Let cool completely before slicing into squares, or it will fall and crumble and be very difficult to cut.  Eat your heart out, cheesecake.  <3
See the layers? Yum.

Crumbly crust mixture.

"

Crust pressed into baking dish.

Cottage cheese looking cream cheese and eggs mixture.

Once the confectioner's sugar was added.

Pouring onto crust.

"

Smoothing out.

About to bake.

See the layers?

Finished product.

Close up of the finished product.

Sliced and ready to devour!

I need to figure out how to make these prettier....


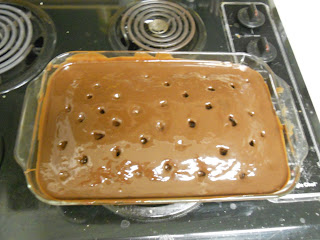
Day 2: Hot Fudge Cake.

Finished Cake.
Sliced so you can see the chocolate ooze.

I tried to make it pretty, but hot fudge is too thick to drizzle, lol.
     So I made a hot fudge cake in honor of Father's Day.  It's a cake that I've been making for years now, and it costs roughly 5 bucks to make.  It will be a hit ANY WHERE you bring it.

You will need:

     * 1 pkg. German Chocolate cake mix.  I use Duncan Hines.
     * 1 14 oz. can sweetened condensed milk.  I use Eagle Brand.
     * 1 jar of Hershey's Hot Fudge.
     * 1 jar Smuckers Hot Fudge.
     * 13 x 9 x 2 '' glass baking dish.

     Bake the chocolate cake as directed on the box. 
     Before it cools, take the back end of a wooden spoon and poke a bunch of holes in it.
     We do this so that when you cut squares the hot fudge oozes out, sort of like a lava cake.
     Next, open the can of sweetened condensed milk, and try to get it in all of the wholes.  Completely saturate the cake with this stuff.  It looks funny, but just trust me.
     Now, take the lid off of the jar of Smuckers Hot Fudge.  Heat it in the microwave on high for 30 second intervals until it's pretty much liquid, stirring between with the end of the wooden spoon. 
     Again, try to saturate the warm cake with the hot fudge.
     Repeat with the Hershey's Hot Fudge.
     Slice, and enjoy!!! 

Saturday, June 18, 2011

Food Blog: Day 1.

     So, I decided to start a food blog all thanks to my little sister.  She asked me since she knows I like to cook, if I would make her birthday cake for this year, and then she proceeded to start spitting out ideas.  So I started looking on the internet for ways to teach myself to do it, and before long I realized that I really really REALLY want to do this. 

     So all day today I have been looking up and bookmarking recipes, how to pages, and much much more.  I'm actually getting started on it today.  I'm going to go to the store with my trusty list and get to working on it.  Tonight. So here you are, following me on my day to day, or week to week, depending on how much cash I have, journey to bettering myself in the kitchen, with the oven as opposed to the stove. 

     Occasionally, if I make something super kick ass for dinner or what have you, I'll post that recipe and picture as well.  So, thanks for reading, and I hope you all enjoy this as much as I know I'm going to.  <3